Plastering needs to be redone once in a while. It can turn rough, uneven walls into smooth ones on which you can paint and decorate. Understanding the stages of plastering is essential for a home update or if you simply want to have better-looking walls. There are two ways you can get it done. You can do it yourself or hire a pro to do it faster and better.
This guide explains the 7 key stages of plastering in simple steps so you can decide if you want to do it yourself or bring in a pro. It’s also part of our expert advice series here at The Trade Core, where we connect homeowners with reliable tradespeople across the UK.
Why Is Plastering Important?
Plastering isn’t just about looks. It makes your walls stronger, smoother, and easier to decorate. A well-plastered wall gives you a better surface for paint or wallpaper and can also help your home last longer. If you’ve ever asked, “How does plastering work?”, this guide will walk you through the full process.
If you’re someone who’s looking to renovate their bathroom, here’s a good read top trending bathroom paint colours & themes this year.
7 Stages of Plastering
Here are the 7 stages of plastering you need to know…
1. Wall Preparation
Before you start, you need to get the wall ready. This means cleaning off old wallpaper, peeling paint, and dust. Fix any holes or cracks and sand down any bumpy parts to make the wall as flat as possible. If your wall is older or uneven, a professional plasterer will know the best way to handle it. This step matters a lot when you want to plaster old walls.
Tip: If you’re working with older walls, calling in a plasterer might save you a lot of time and stress.
2. Priming the Surface
Next, mix PVA glue with water and roll or brush it onto the wall. This helps the plaster stick and keeps the wall from drying out too quickly. Let it get slightly sticky before you start plastering. It’s a small but important step. Not sure how to mix it right? A plasterer can handle this part quickly and make sure it’s done correctly.
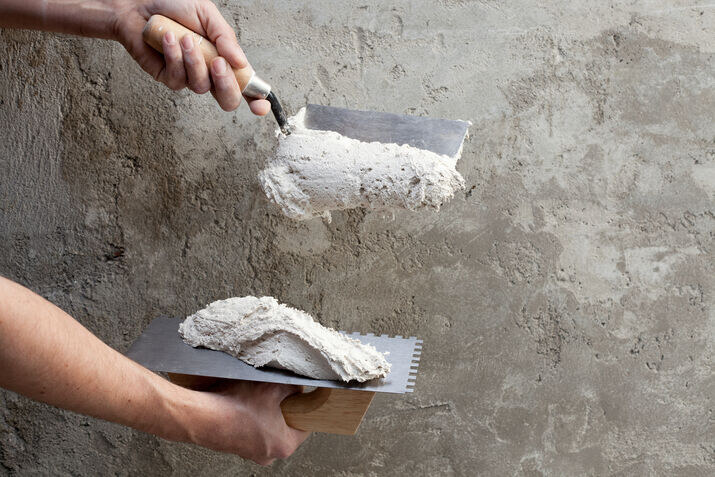
3. Mixing the Plaster
Mixing plaster takes a little practice. Always pour water into the bucket first, then add plaster powder while mixing. A paddle mixer (a tool that goes on a drill) works best for getting a smooth, lump-free mix. The plaster should be thick enough to hold on a trowel but easy to spread. Plasterers are good at knowing what the mix should feel like. The right mix also depends on the types of plastering you need.
4. Applying the First Coat
Start in the bottom corner and use long upward strokes to apply the first coat. This layer called the base or scratch coat, should be around 2mm thick. It doesn’t have to look perfect, but it needs to be even. If you’re plastering a bathroom wall, this first layer matters even more because moisture can cause problems later if it isn’t done well.
5. Smoothing Out the Surface
Before the first coat gets fully hard, check the wall for bumps or dips. Use your trowel to flatten high spots and fill in low ones. You can also use a damp brush or sponge to soften the edges and blend areas together. This step can be tricky for beginners. A professional knows the best timing to smooth the surface perfectly.
One of the most useful plastering tips is to keep your tools clean, don’t rush the drying process, and apply even pressure during smoothing for better results.
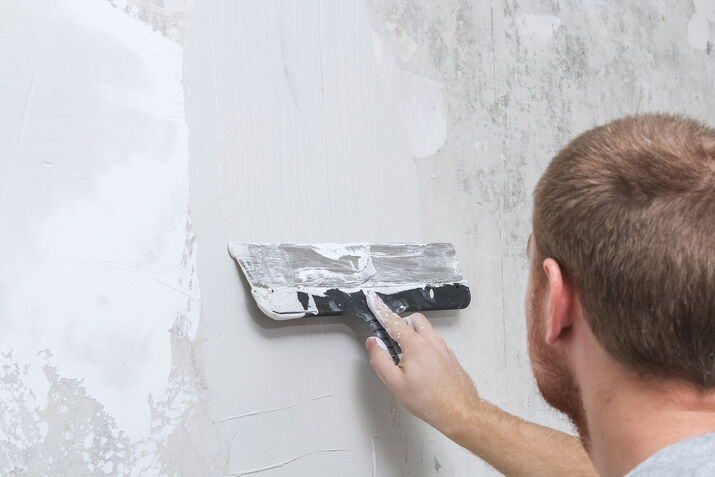
6. Applying the Second Coat
This is the finishing coat, also called the skim coat. Apply a thin layer about 1mm thick using overlapping strokes for a smooth result. As it starts to dry, go over it again with a slightly wet trowel to give it a polished look. This stage is important if you want a clean, paint-ready surface. Many people do the first coat themselves, then hire a plasterer for this part to make sure it looks great.
Lots of homeowners prepare the wall, and then bring in a plasterer to do the skim coat. It saves time and makes sure the finish looks professional. This is the part most people are talking about when learning how to skim a wall for beginners or trying it out for the first time.
7. Drying and Sanding
Let the plaster dry completely. This usually takes 24 to 48 hours. Then, lightly sand any rough spots with fine sandpaper and wipe off the dust with a damp cloth. The surface should now feel smooth and be ready for paint or wallpaper.
If it still looks or feels uneven, a plasterer can fix those spots quickly and easily. This is the final step in the stages of plastering, and it gives your wall a clean, finished look.
When Should You Consider Hiring a Professional?
Doing it yourself can be fun, but there are times when it’s better to hire someone. Call a pro if:
- You’re plastering large areas or ceilings.
- The wall is badly damaged or uneven.
- The wall is in the main room and needs to look perfect.
- You’re short on time or don’t have the tools.
Plasterers have the skills, tools, and experience to get the job done fast and well. If you’ve wondered, what does a plasterer do, the answer is they prep the wall, choose the right plaster, apply it smoothly, and leave a clean finish.
Need help finding a trusted local plasterer? The Trade Core connects you with vetted tradespeople in your area! Read more about Trending Bathroom Designs for 2025.
Final Thoughts
Plastering is a skill that requires following the right steps to achieve a professional finish. It’s something that people can easily do but it is always smart to bring in a professional.
Understanding the 7 stages of plastering can help you plan better, prepare, and feel confident in hiring someone to do the job. To find skilled plasterers near you, visit The Trade Core website, a trusted platform for connecting quality tradespeople.
If you’re someone from Bromley, The Trades Core can help you find reliable handyman services in Bromley for homeowners.